Home |
Map |
Projects |
Construction |
Soldering |
Study |
Components |
555 |
Symbols |
FAQ |
Links

Model Railway Level Crossing Lights
A kit for this project is available from
RSH Electronics.
Download PDF version of this page
A magnet under the train operates reed switches positioned on the track.
The trigger reed switch starts the sequence by switching on the amber light,
a few seconds later the two red lights start to flash.
When the train has passed the level crossing it operates the cancel reed switch
which switches off the lights until the next train arrives.
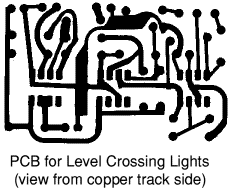
There is a PCB pattern for this project, but if you don't have facilities to make PCBs you can build
this project on stripboard instead. Please see the
New Railway Modellers
website for a stripboard layout and advice on making model lamps and barriers.
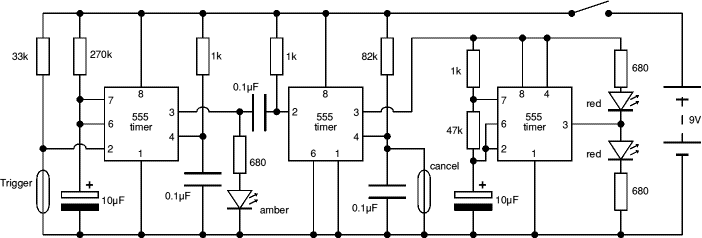
This project uses a 555 monostable circuit
to switch on the amber LED for a few seconds. When this switches off it triggers a
555 bistable circuit which switches on a
555 astable circuit to flash the red LEDs.
Parts Required

- resistors: 680 ×3, 1k ×3, 33k, 47k, 82k, 270k
- capacitors: 0.1µF ×3, 10µF radial ×2
- red LED (3mm best) ×2
- amber* (or yellow) LED (3mm best)
* some amber LEDs are too orange to look correct, yellow may be better
- 555 timer IC ×3
- 8-pin DIL socket for IC ×3
- on/off switch
- battery clip
- reed switch ×2
- miniature magnet - each locomotive needs one
- printed circuit board (PCB) - pattern given below
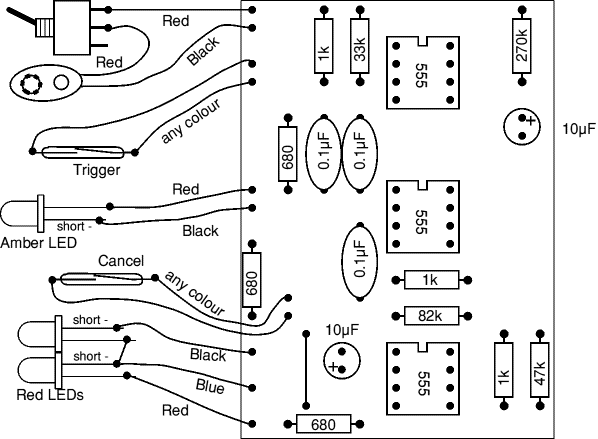
PCB component layout

Track connections

The reed switches can be held in place between the rails with a small piece of blu tac.
Each locomotive will need a miniature magnet glued to its underside, test first
with blu tac, then use superglue.
Circuit diagram

Circuits: 555 monostable (on left) |
555 bistable (in middle) |
555 astable (on right)
PCB copper track pattern

Stripboard layout
If you don't have facilities to make your own PCB you can build this project on stripboard. Please see the
New Railway Modellers
website for a stripboard layout as well as advice on making model lamps and barriers.
 A kit for this project is available from
RSH Electronics.
If you are new to electronics buying a kit is a good way to be sure you have the correct parts for the project.
Return to Projects page
© VCampus 2013, The Electronics Club,
vcampus.co


