Home • Database • Microsoft SQL Server
Working with SQL Server using Management Studio (SSMS)
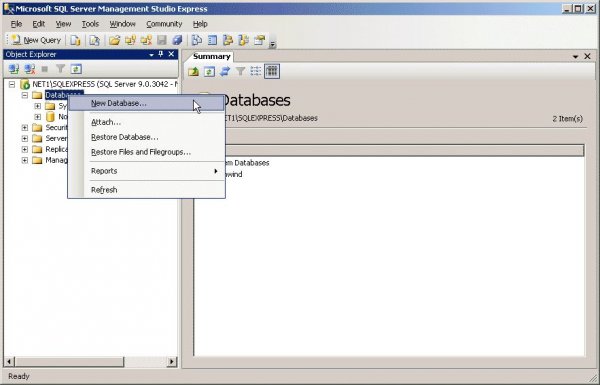
SQL Server Management Studio (SSMS) Basics
SQL Server Management Studio (SSMS) is one of the most important tools you’ll use with SQL Server. It provides a user-interface for common database tasks. Although not comprehensive, here are a few of the more common tasks: -Create databases. -Design tables and other database objects. -Add, update, or delete data from databases. -Backup and Restore databases. -Run queries.Install SQL Server Management Studio
SQL Server 2008 R2 Menu ItemIf you have SQL Server installed, there is a good chance that you already have SSMS installed. The easiest way to tell is to look at the Start Menu. On the Start Menu, select All Programs, expand Microsoft SQL Server [YOURVERSION], and then look for SQL Server Management Studio. If you have it, skip down to the next section. If you don’t have it, here are some quick points: 1. First, make sure you’ve installed SQL Server. It helps if you understand how to investigate what version(s) of SQL Server are installed on your machine. 2. If you do have SQL Server installed, but you still don’t see the SQL Server Management Studio link, then it is possible that you installed the database engine without the tools. This is easily solved by running the SQL Server setup again (for the same version) and adding features to your existing database instance. The feature should be called “Management Tools”.Connect to your SQL Server Instance
Click “SQL Server Management Studio” on the start menu to launch it. This will bring up a connection dialog like this: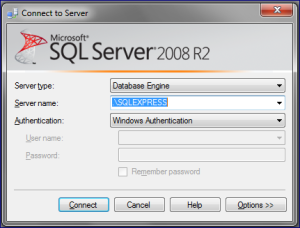 The Server name field allows you to specify your SQL Server instance. This is the instance that contains and manages your databases. If you don’t know what instances are on your machine, it’s easy to find out. For example, if you just installed the express edition, that instance is “.SQLEXPRESS” by default. If it was another edition, you could have installed a different named instance in the form of “.YOURNAMEDINSTANCE”. Or you could have installed the default instance, which is simply “.” or “YOURMACHINENAME” or “localhost”. Note that if your SQL Server is remote (and you have access), you just substitute the remote machine name. For example, if my machine name was MYREMOTEMACHINE, then the connection to SQLEXPRESS on that machine would be MYREMOTEMACHINESQLEXPRESS, and the connection to the default instance would just be MYREMOTEMACHINE.
Make sure the Server type is set to Database Engine. The Authentication setting controls the type of security you use to connect to SQL Server. By default SQL Server uses Windows Authentication and adds your user as a system administrator during installation. So that should work. But there will be other times where you may have to use SQL Server Authentication with a user name and password. Security will be discussed more in a future video.
Find your Installed SQL Server Versions and Instances
It’s more common than you would expect to have SQL Server installed on your machine without knowing the exact version or edition. With tools and applications installing SQL Server behind the scenes, you may have unknowingly installed SQL Server. In this post, I’ll try to quickly explain some easy ways to investigate this question. This will include: 1. Using the Programs and Features control panel tool. 2. Understanding and viewing SQL Server instances. 3. SELECT @@VERSIONHow to find out the Sql Server version and service pack
@@VERSION returns information about the version, processor, build date, copyright info and the operating system of the current SQL Server installation SELECT @@VERSION as VERSION returns 'Microsoft SQL Server 2005 - 9.00.3042.00 (Intel X86) Feb 9 2007 22:47:07 Copyright (c) 1988-2005 Microsoft Corporation Developer Edition on Windows NT 6.0 (Build 6000: ) ' on my machine SERVERPROPERTY displays information about the server instance We can use the SERVERPROPERTY with the 'propertyname' to get information about the SQL SERVER instance. For eg: To get the product version, use : SELECT SERVERPROPERTY('productversion') as ProductVersion returns '9.00.3042.00' on my machine To get the Service Pack information or the level of version, use : SELECT SERVERPROPERTY ('productlevel') as Level returns 'SP2' on my machine To get the product edition, use : SELECT SERVERPROPERTY('edition') as EDITION returns 'Developer Edition' on my machine Similary you can retrieve the LicenseType, MachineName, Number of client licenses on the current instances, servername and many more property information about the current sql server instance.SQL Server Version and Instances
One well-known way of investigating installed versions is the Programs and Features control panel tool (which used to be Add/Remove Programs). In Windows 7, an easy way to get there is to type “Programs and Features” in the search box on the start menu Your intent here is not necessarily to uninstall anything (although you could). Instead look through the list of installed programs for programs named “Microsoft SQL Server”. For example, in my list I see around ten items that start “Microsoft SQL Server 2008 R2″. Note that it is possible to have multiple versions of SQL Server installled at the same time, so you could also see “Microsoft SQL Server 2005″ in the same list. Even though the control panel is easy and well-known, it doesn’t really tell the whole story well. In order to really understand what versions of SQL Server are installed, you have to understand SQL Server Instances. Each instance of SQL Server operates independently and contains its own collection of databases and settings. There are two types of instances: 1. Default Instance : a single instance named MSSQLSERVER. You connect to this instance using only the server name (ex: localhost) 2. Named Instance : one or more instances. You connect to these instances uing the server name + instance name (ex: localhostSQLEXPRESS) It’s possible have only one instance installed on your machine. But it’s also possible to have many instances. And each of those instances could be a different version of SQL Server! To understand your scenario, use the SQL Server Configuration Manager tool that installs with both SQL Server 2005 and 2008. On the start menu, expand the “Microsoft SQL Server [YOURVERSION]” menu, and then expand the “Configuration Tools” submenu. Launch the SQL Server Configuration Manager tool. Here is a screen shot to use as an example: In this example, I clicked on “SQL Server Services” in the left pane. The right pane shows the different services installed on my machine. The ones that we’re interested in are the ones that have “SQL Server” in the Service Type column. You’ll notice that there are two rows with this distinction that are highlighted here. The instance name is listed in parantheses in the first column. In this case there are two instances:
- MSSQLSERVER: the default instance.
- SQLEXPRESS: a named instance, which is the default name of the SQL Server Express instance.
Each instance shows that it is running in its own process. This is useful to know, but the important step is determining the version. To do this, right-click on the instance, and then click Properties. In the Properties dialog, select the Advanced tab. Scroll down to the Version row. Here is what it looks like for the MSSQLSERVER instance on my machine:
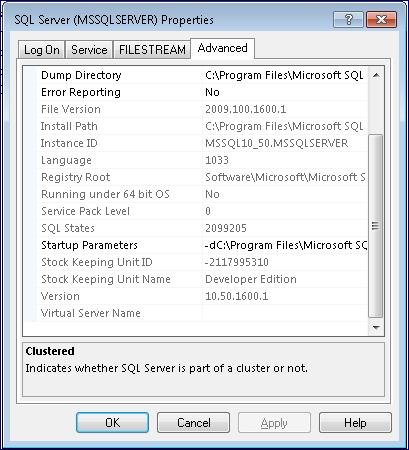 The version number for this instance is 10.50.1600.1. In order to translate this, you could search for that version number on the internet. There are several resources that have compiled a list of SQL Server version numbers for you. Here is one example:
SQL Server Version Database on SQLSecurity.com
Resources like this tell me that my default instance is SQL Server 2008 R2 RTM. The other great thing about a version database is that you might find that you’re not using the latest release. For example, I don’t have any of the post-RTM updates installed on my machine.
One final note is that you can see the “Stock Keeping Unit Name” which is a strange way of calling out the edition. In this case my default instance is the “Developer Edition” of SQL Server 2008 R2. The SQLEXPRESS instance on my machine says “Express Edition with Advanced Services”. Sometimes capabilities require a specific edition of SQL Server, so this is sometimes as important as the version information.
SELECT @@VERSION
I think looking at SQL Server Configuration Manager is the best way to truly understand what is on your machine. But there is an easier way if you already know your instances. You can run a simple query. Here’s how:
1. On the Start Menu, go to All Programs, Microsoft SQL Server [YOURVERSION].
2. Launch SQL Server Management Studio.
3. When the Connect to Server dialog appears, log onto the SQL Server Instance of interest. For example, if you’re on the local machine, you can use localhost or localhostSQLEXPRESS in the Server name text box. Instances were discussed in the previous section of this post. Make sure that the Server type is set to “Database Engine”.
4. Click on the New Query button on the toolbar.
5. In the query window, type the following query: SELECT @@VERSION
6. Press the Execute button to run the query.
7. Look at the version text in the Results window.
On my machine, for the LOCALHOSTSQLEXPRESS instance, this is the version information from this query:
Microsoft SQL Server 2008 R2 (RTM) – 10.50.1600.1 (X64) Apr 2 2010 15:48:46 Copyright (c) Microsoft Corporation Express Edition with Advanced Services (64-bit) on Windows NT 6.1 <X64> (Build 7600: ) (Hypervisor)
This is perhaps the easiest way of detecting the version of whatever SQL Server instance you’re connected to. But you can see why I covered the control panel and instances first. If you don’t even know what instances are on your machine, you won’t know how to connect to them to run this query in SQL Server Management Studio! One final note, it is possible to have SQL Server installed on your machine without SQL Server Management Studio. If that is the case, you can still use the previous methods for determining your version, but you’d have to install the SQL Server Management Tools to run a query. This will most likely be covered in a later post.
How can I open an .MDF file in SQL Server?
Let’s say someone wants to give you their SQL Server database. Maybe they want you to manage it, troubleshoot it, or learn from it. So they hand you a .MDF file and .LDF file and tell you that you need SQL server 2008 R2 to open them. So you install SQL Server 2008 R2 Express (which, to your relief, is free). You open SQL Server Management Studio(SSMS), and you try to open the .MDF file. You get the following error: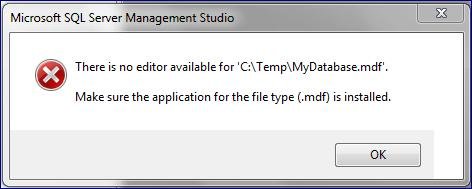 There is no editor available for 'C:TempMyDatabase.mdf'. Make sure the application for file type (.mdf) is installed.
The Solution:
.MDF files are SQL Server database files and .LDF files are the associated log files. But you can’t really “open” them. Instead, you have to “attach” to them. Once you attach, you’ll see the database in the object explorer of SSMS. If you’re thinking, “Why wasn’t the Backup and Restore process used instead of passing around these database files?” It’s a valid question, but it doesn’t help the reader staring at .MDF and .LDF files with no clue how to access them. However, if you need to move a database around, you should do a search on “backup restore attach detach sql server” (without the quotes) in your favorite search engine. You’ll get lots of opinions to help you decide the best approach.How to Attach in a Perfect World:
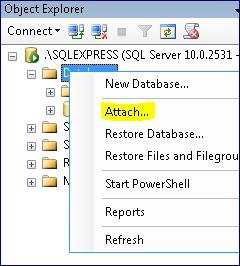 There’s a couple of different methods. I’ll give you the “easy” way through SQL Server Management Studio (SSMS) and then point you to other methods using T-SQL queries.
1. Launch SSMS.
2. Connect to your SQL Server Instance.
3. Right-click on Databases in the Object Explorer.
4. Click Attach.
5. In the Attach Databases window, click the Add button.
6. Navigate to the directory containing the .MDF and .LDF files.
7. Select the .MDF file, and press OK.
8. Press OK again to attach the database.
You should see the database appear in the Databases node (press F5 if you don’t). You can now explore the data using SSMS. These same steps are documented in the MSDN here. I’m just summarizing to make it easier for you.
There are two ways to accomplish the same thing in a T-SQL script. First, you can use the sp_attach_db stored procedure. This is shown here. Or you can use the CREATE DATABASE command with the FOR ATTACH argument.
So, the World isn’t Perfect
If your database is successfully attached, then stop reading and go use it. But if you see any errors or unexpected behaviors, I’ll try to share some troubleshooting suggestions. First, you may get a generic error like the following.. An error occurred when attaching the database(s). Click the hyperlink in the Message column for details.
You might be asking, “Where’s the hyperlink?” I’ll show you in the next screenshot (circled in red), and it will also be our first example.
1. Access Denied:
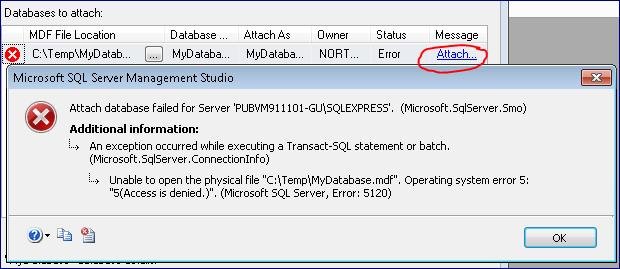 Attach database failed for Server ###. (Microsoft.SqlServer.Smo) Unable to open the physical file “####”. Operating system error 5: “5(Access is denied.)”. (Microsoft SQL Server, Error 5120)
This access denied error could have a few different causes. Basically, you don’t have the required access to the .MDF or .LDF files. This can happen if you get the file from someone else. When they detach the database file, the file permissions are changed to give only that user full control. Also, even if you see that the file has full control for the Administrators group, it may not be enough. Remember in Windows 7/Vista, those permissions are often only realized when you’re running an application as an Administrator.
So here are several choices to fix it:
1. The easiest solution is to close SSMS and then run it as an Administrator. Perform the attach as an Administrator, and it’s likely going to work.
2. Another solution is to explicitly grant full control to the .MDF and .LDF files to your user account. This can be done by right-clicking the files, selecting Properties, and modifying the Security tab.
3. A final solution is to copy the files to the default directory for your other database files. To find out what that is, you can use the sp_helpfile procedure in SSMS. On my machine it is: C:Program FilesMicrosoft SQL ServerMSSQL10_50.SQLEXPRESSMSSQLDATA. By copying the files to this directory, they automatically get permissions applied that will allow the attach to succeed.
2. Access Denied Variation 2
There is another variation of the Access Denied message that has a simple solution:
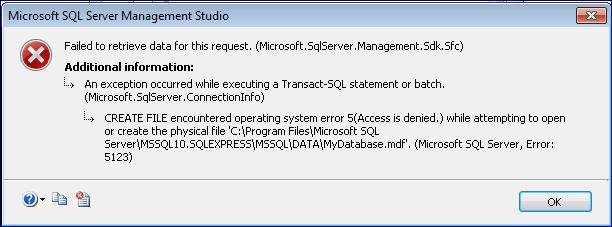 Failed to retrieve data for this request. (Microsoft.SqlServer.Management.Sdk.Sfc) CREATE FILE encountered operating system error 5(Access is denied.) while attempting to open or create the physical file '####'. (Microsoft SQL Server, Error: 5123)
This error means that the file is already opened exclusively by another application. The most likely cause is that this database file is already attached to an instance of SQL Server. Double-check your list of databases to see whether it is already in the list. It’s also possible for applications to use .MDF files directly with a feature called User Instances. If an application is using a .MDF file in this way, then it would have to close before you could attach the to that database file.
3. Database is Read-only
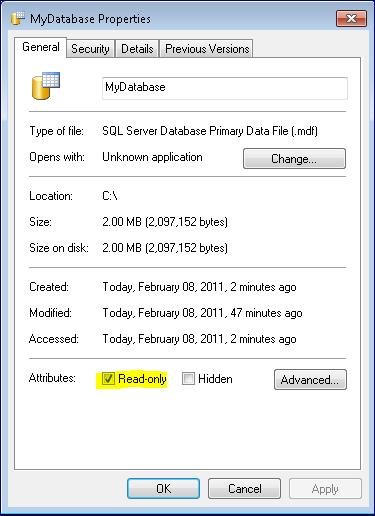
This is not so much an error as an undesired result. When you load the database, it is in a read-only state. You can tell by the gray shading of the databasee icon (not to mention the “Read-Only” label next to it).
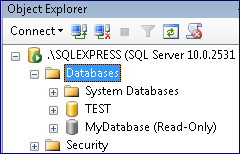 The most probable cause is that the .MDF file you attached to is read-only. Just right-click on the .MDF and .LDF files, select properties, and then uncheck the Read-only check box.
 4. Unable to Downgrade
The next error happens when you try to attach a database of a higher version of SQL Server (like SQL Server 2008 R2) to a SQL Server Instance of a lower version (like SQL Server 2005).
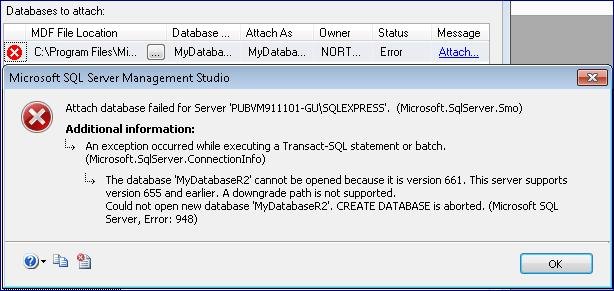 Attach database failed for Server '####'. (Microsoft.SqlServer.Smo) An exception occurred while executing a Transact-SQL statement or batch. (Microsoft.SqlServer.ConnectionInfo) The database '####' cannot be opened because it is version 661. This server supports version 655 and earlier. A downgrade path is not supported. Could not open a new database '####'. CREATE DATABASE is aborted. (Microsoft SQL Server, Error: 948)
This has never been supported. You can attach a database of an older version of SQL Server to a newer version, but you can’t go the other direction. If you want to verify the version of SQL Server you’re running, see this post.
A Parting Word on Detach:
This post is just covering the scenarios of, “How do I open this .MDF file” and “Oh, I have to attach it, why am I getting errors?”. But how were these files obtained in the first place? The answer is that there is a corresponding Detach feature in SQL Server. You can find it by right-clicking on the database in SSMS, selecting tasks, and looking for Detach. Before you do this, though, run the sp_helpfile procedure in a query window in the context of your database. This will tell you *where* the detached .MDF file will be located. After you’ve detached the file, you can attach it to any SQL Server instance. Although this post was about Attach, I think it’s worth mentioning this for completeness.
Attach database failed for Server '####'. (Microsoft.SqlServer.Smo) An exception occurred while executing a Transact-SQL statement or batch. (Microsoft.SqlServer.ConnectionInfo) The database '####' cannot be opened because it is version 661. This server supports version 655 and earlier. A downgrade path is not supported. Could not open a new database '####'. CREATE DATABASE is aborted. (Microsoft SQL Server, Error: 948)
This has never been supported. You can attach a database of an older version of SQL Server to a newer version, but you can’t go the other direction. If you want to verify the version of SQL Server you’re running, see this post.
A Parting Word on Detach:
This post is just covering the scenarios of, “How do I open this .MDF file” and “Oh, I have to attach it, why am I getting errors?”. But how were these files obtained in the first place? The answer is that there is a corresponding Detach feature in SQL Server. You can find it by right-clicking on the database in SSMS, selecting tasks, and looking for Detach. Before you do this, though, run the sp_helpfile procedure in a query window in the context of your database. This will tell you *where* the detached .MDF file will be located. After you’ve detached the file, you can attach it to any SQL Server instance. Although this post was about Attach, I think it’s worth mentioning this for completeness.- University
- Online Tips
- Engineering
- Programming
- General Subjects
- Science
- News
- Jobs
- Commerce
- General Knowledge
- Story, Tales & Poem
- Software Application
- Framework
- Operating System
- Database
- Networking
- Quiz

Comments 1